
It is that time of year again. Winter is almost over, and spring is just around the corner. We have been cooped up inside, especially if you live in northern climates. Even in warmer climates, the springtime is an excellent time to open up the windows and air out the house, condo, or apartment.
But before you open up those windows, it is time to embark on a cleaning program, decluttering, and renewal of your home. For many, the task may seem daunting, especially if you have a large home. However, by following a spring cleaning checklist prioritized to your schedule and needs, the job can be spread over several days and not appear to be quite so daunting.
Let’s get started with a review of what you should have in your spring cleaning checklist, some of the tips and tricks, and some of the common cleaning mistakes to avoid.
What Is a Spring Cleaning Checklist?
A spring cleaning checklist covers all of the rooms, the windows, window coverings, the walls, paintings, mirrors, and anything hanging on the wall. Cleaning the furniture is also part of the activity especially dusting under chairs and couches.
Your checklist can be used to keep track of your progress as you move through the house, and your checklist can be referred to year after year. A checklist also helps to ensure that nothing is missed. Checklists can be delegated room by room to other members of the family to help you complete your cleaning.
There is another aspect to spring cleaning. Getting rid of all of the old papers, magazines, and newspapers and generally de-cluttering your home should be considered. If you have things that you have not used in some time, it may be time to consider getting rid of them. Many people will place these items into one of three categories – throw out or recycle, donate or give away, and items that you want to save for another time.
Most people consider spring cleaning as actually cleaning dust from everything in your home. Spring cleaning is much more than cleaning. It can be time to organize your home. For example, go through your makeup, clean them and organize them. Garages are notorious places for storing things that should be discarded. Gradually over time, the garage becomes cluttered and filled with items you have not used in some time. Your spring cleaning should include these elements.
Another area to focus on is the basement or crawl space. Many people even have storage shelves to store all their stuff. Unfortunately, these items end up in the basement and stay there. Years later, when you are moving, many wonder why they kept these things and why they are paying to move items that should have been removed years ago. Now is the time during spring cleaning to review everything stored in the basement or crawl space and get rid of them.
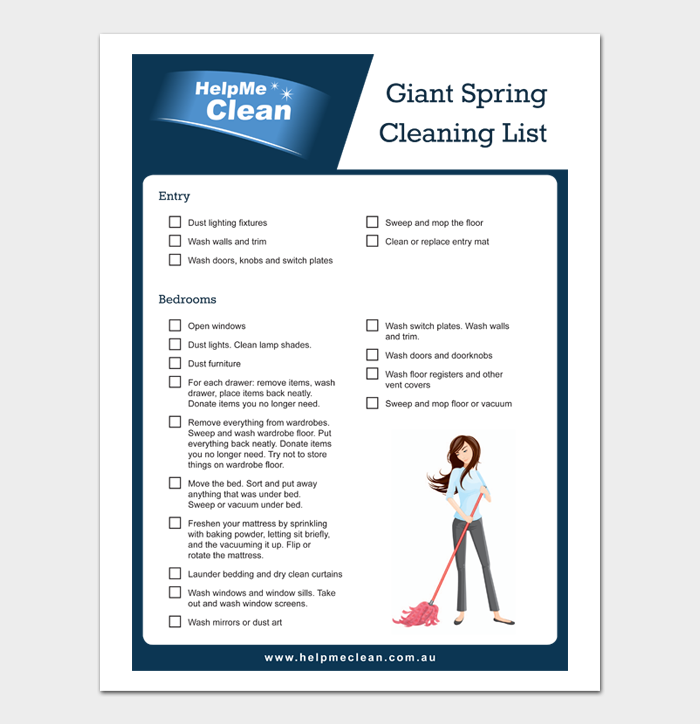
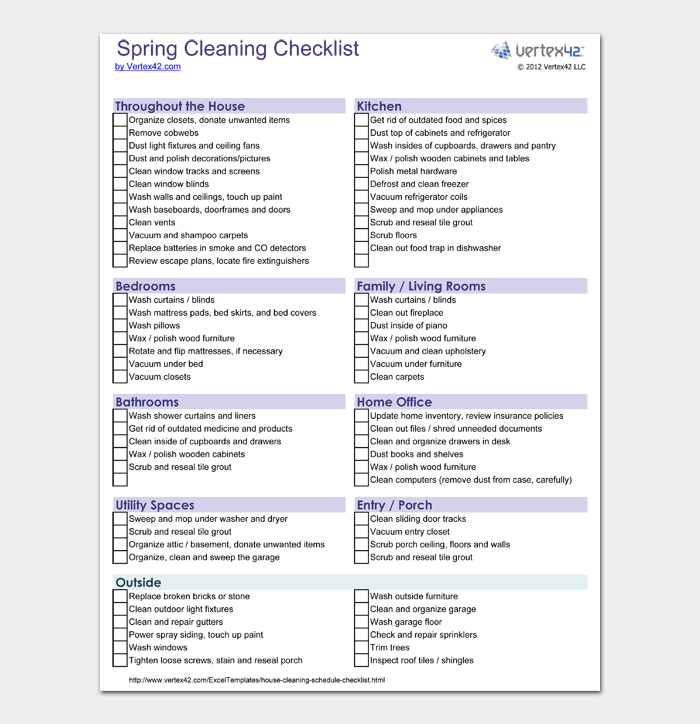
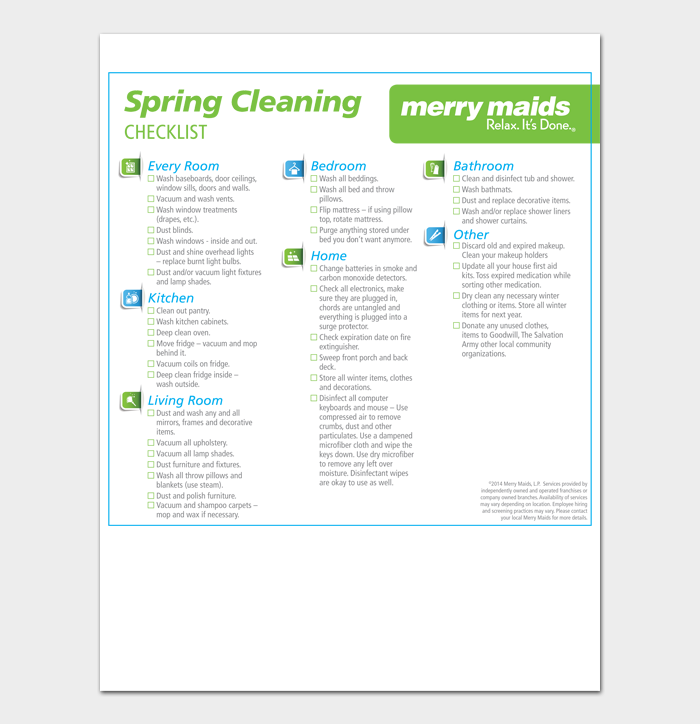
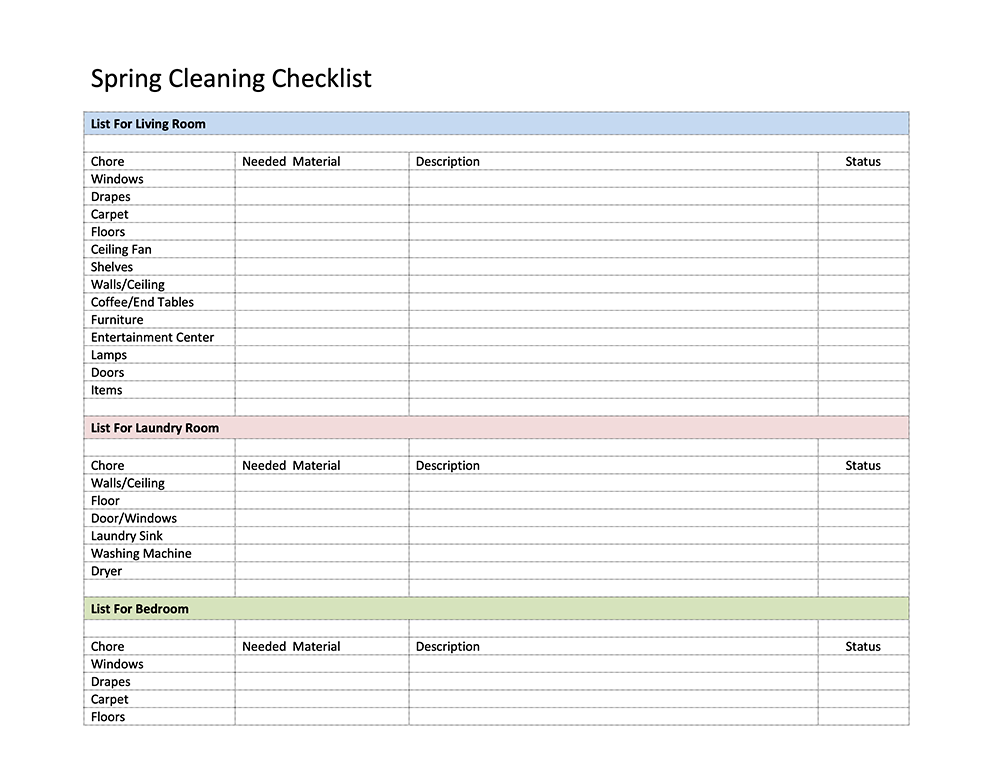
Spring Cleaning Checklist Templates & Examples
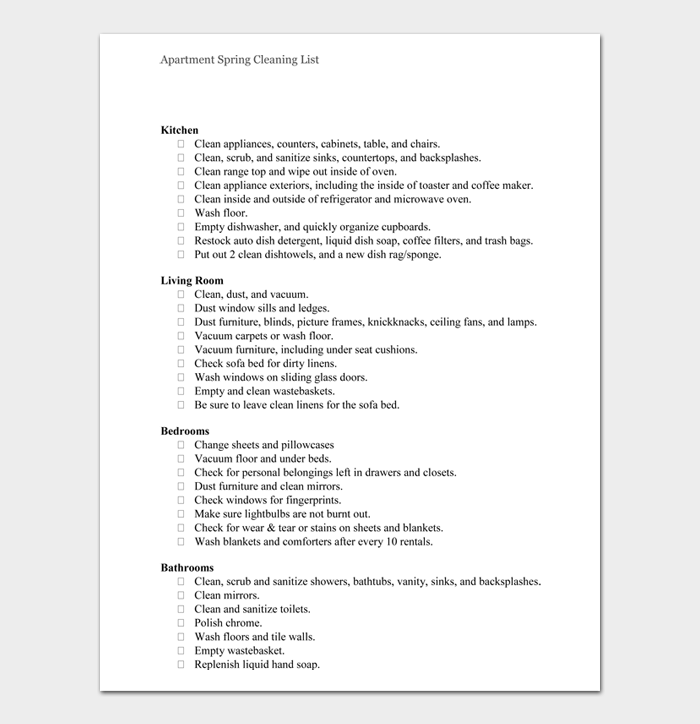


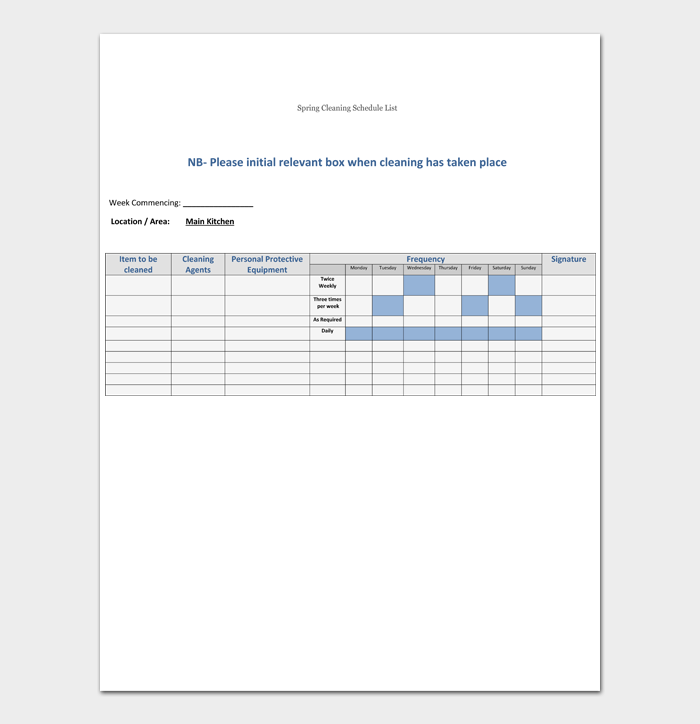


Printable Spring Cleaning Checklist
Why Have a Spring Cleaning Checklist?
Having a spring cleaning checklist helps everyone stay organized and focused on the task without missing any crucial areas. If you delegate some of the cleanings to other members of the family, the list not only tells them what to do it can be used to track their progress.
Spring cleaning can be a large task depending on the size of your home and the last time your house was cleaned. Tracking progress makes everyone feel better about the task and provides a sense of accomplishment.
With your spring cleaning checklist organized by room or perhaps activity, it is easy to tackle one or two activities every day. For example, washing and dusting the windows one day, cleaning the blades on the electric fans on another, and so on. Spreading the work out avoids being overwhelmed.
The Ultimate Spring Cleaning Checklist (30-Day)
Many readers find spreading the spring cleaning over 30 days helps them stay motivated and track their progress. Once you get started, you will find each task is quick to complete, and you can track your progress easily. Tackling a few small projects every day will keep you motivated, and avoid being overwhelmed and quitting before you have made progress.
Before you start, consider obtaining some containers to help with decluttering. Container one should be used for items you want to donate. Container 2 is used for items that need repair and you plan to repair them; otherwise, they should go out in the garbage or be recycled if they are electronics, for example. Container 3 is used for items you want to retain. Perhaps they are heirlooms or items that were in the wrong location. Later place these items in their rightful place.
For large items, use a pen and paper to keep track of those items and which container they should be part of.
Now you are ready, and it is time to begin your 30-day spring cleaning checklist. Many people will adopt the order list below; however, if it makes more sense to do things on different days in your situation, feel free to rearrange the list.
Day 1 is dusting day. Remove cobwebs from the walls and the corners of your rooms throughout the house. Afterward, sweep and vacuum all of the floors. Dust the underside of the tables and chairs and vacuum around them. Don’t forget the mirrors and paintings on the walls. They can collect a lot of dust, especially along the top surface. Dust your furniture, especially any knick-knacks you have displayed on shelves and display cases.
Day 2 inventory your clothing – it is time to clean out any old shirts, blouses, etc., that are no longer needed. These can be placed in donation boxes or, if they are in bad shape, used as cleaning rags. Pack up seasonal clothes for use next winter.
Day 3 clean out old medicines – we tend to collect medicines, both prescription and over-the-counter medications, keeping them well past their useful dates. Expired medications should be disposed of following local guidelines. Most pharmacies will take old medications. Review your first aid supplies and update as needed. Linen closets are another area where things are stored and never used. Review the contents and dispose of them – donate as much as possible.
Day 4 clean and sort your shoes – throw out the old ones unless you will use them while gardening. Clean the closet floors and wash your slippers. Shoes should be cleaned and buffed to make them look new again.
Day 5 clean small appliances – follow manufacturer’s instructions for all appliances. Clean your coffee maker, toaster and toaster oven, and all other appliances you have in your home. A clean appliance is not only nice to look at; it avoids the possibility of food poisoning or fires in the case of a toaster.
Day 6 clean your car – the floor mats may be filthy and in need of a thorough cleaning. Wipe down all interior surfaces using a cleaning solution and rag. Use a car wash or a full cleaning service if you prefer.
Day 7 clean your refrigerator, freezer, and kitchen cabinets – clean out any old expired food and items that you will not be consuming. Wash all of the surfaces, including the ice cube trays. The same applies to your pantry and cabinets. It’s amazing how many items have expired hidden away inside the fridge or the pantry.
Day 8 – clean and declutter your bathroom – remove everything and clean the surfaces of the counter and the inside of all of the cabinets. Throw out expired cleaning products, and old warn razors and toothbrushes. Replace the shower curtain liner.
Day 9 – wash or dry clean the household linens – pillowcases, couch covers, and any other linens that are not routinely cleaned. If you have drapes or linens, wash them or send them to the dry cleaners. Don’t forget ironing board covers, floor mats, and small rugs.
Day 10 – clean electronics – with care. Avoid using harsh cleaners and only use a damp cloth. Clean phones, tablets, television screens, computer screens, keyboards, and game consoles.
Day 11 – remove junk – from overflowing junk drawers, decide what should be kept, and get rid of the rest. Clean the drawer before returning the saved items to the drawer. Dispose of pet toys and remove the dead leaves from plants.
Day 12 – clean the oven – including the cooktop and ventilation hood. Run the self-cleaning function on the oven and wipe the inside surfaces once it has cooled.
Day 13 – cleaning your windows inside and out is a large task. Remove the screens and vacuum the sills before washing with soapy water and rinsing. Some people use vinegar and water to remove any grease and soil, especially on the outside. Use a squeegee to remove access water and hand dry with a towel.
Day 14 – collect all of the newspapers, packing materials, and magazines and recycle them. Shopping bags can be reused. Scanning documents and saving the electronic version is a great way to get rid of paper documents. Always shred any documents you consider important, and back up your electronic copies.
Day 15 – wash and clean makeup brushes as well as hairbrushes. Clean the lint off the intake on your hairdryer. Get rid of makeup that is more than 3 months old.
Day 16 – clean your plumbing – clean out all of the drains with appropriate cleaners available on the market at your local hardware store. Check for leaks and make repairs as needed.
Day 17 – change out seasonal accessories – remove winter decorations, change scented candles to fresh spring candles, especially if they are scented, and clean your fireplace hearth.
Day 18 – vacuum furniture fabrics – vacuum the couch and chairs and any furniture with fabric covers, vacuum under all of the furniture. If you cannot move them, use an extension on your vacuum to reach under them.
Day 19 – tidy up and clean your garage – get rid of all items not used or touched in a year, clean your gardening clothes and tools and sweep the garage floor, the steps, and the patio.
Day 20 – focus on your home office – cleanout desk drawers, pens, papers, and anything that has not been used for some time or is broken. Organize your desk, e.g., paper clips, in one place and take your coins to the bank.
Day 21 – remove extra mugs and glasses – we all collect mugs from a variety of places, and glasses break, leaving a mismatched set. It’s time to get rid of them and lower the clutter in your cupboards. Change filters in water bottles and devices with water filters.
Day 22 – organize purses, wallets, and bags – decide which ones you want to keep and get rid of the rest. Either donate them, sell them on an online service or give them away.
Day 23 – clean out your closets – remove clothes you have not worn in some time and any that are damaged. Decide which ones can be donated or repaired. The same applies to shoes and boots.
Day 24 – review your games, hobby supplies, and collections – decide which ones you would like to retain and donate the remainder. Clean jewelry and any silverware that has been tarnished.
Day 25 – involve the kids in cleaning and tidying up their rooms – teach your kids about cleaning and add a tidy room to their weekly activities. Decide which books you want to keep and those you would like to donate. Special books can be kept for future grandchildren and stored until the time arrives.
Day 26 – weekly dusting and vacuuming – get into the habit of dusting furniture and vacuuming window sills and floors. Baseboards collect dust, so a weekly dusting will keep them clean. Dust first and then vacuum the floors.
Day 27 – clean the walls – review all of your walls and remove any marks or stains. Touch up any areas where the paint was chipped, or the paint has discolored.
Day 28 – wash your sheets and pillowcases weekly and wash your bed linens, mattress covers, liners for pillows, blankets, and duvets. Blankets and duvets may need to be sent out for dry cleaning.
Day 29 – get rid of unwanted items – during the spring cleaning process, there likely have been many items you have decided you no longer need. Now is the time to get rid of them by selling them or donating them to a charity.
Day 30 – time to throw things away – anything you cannot sell or donate should be thrown away following your state guidelines for items such as paint and electronics. You may need to hire someone to take some of the larger items. Advertise items in bad shape for free on social media. You may help a family or a student who does not mind using your old couch.
Spring Cleaning Tips and Tricks
Spring cleaning your entire house is a huge job and may appear overwhelming to many. There are several spring cleaning tips and tricks that will help place the task in perspective and help manage the task. Here are the top ten tips and tricks readers might want to consider:
Tip 1 – develop a plan – review your entire home, going from room to room, and identify the areas most in need of cleaning. These are usually areas where you skip routine cleaning. Make notes and prioritize your list and identify a schedule to tackle them.
Tip 2 – de-clutter – one of the first things you should do is to de-clutter your home. The task of cleaning is so much easier when a room is free of clutter. Separate items into categories – to throw out, to donate, to sell, and items you want to keep.
Tip 3 – use a HEPA vacuum or a central vacuum that exhausts to the outside. Regular vacuums do not capture tiny airborne particles, which cause many allergies for some people. This includes pet dander, allergens, skin particles, and household particles. A HEPA vacuum will capture them, and a central vacuum will exhaust them to the outside.
Tip 4 – work from top to bottom – dust walls and ceilings, remove cobwebs and work from the ceiling to the floor. Some particles will escape your duster and fall to the floor. Follow up by vacuuming the floor and furniture such as your couch to remove these particles.
Tip 5 – clean windows and baseboards – dust settles on window sills and baseboards. Clean the windows, vacuum the sills and baseboards and wipe them clean with a damp cloth. Take the screens off and clean them with soap and water outside. Even vacuuming them with a soft vacuum brush tool will make a huge difference.
Tip 6 – clean your kitchen cupboards – wipe down all of the cabinets, clean the pantry, and throw out any items past their best before date and items that will not be used.
Tip 7 – clean your appliances – use gentle cleaners for the surface areas, especially on stainless steel appliances. Remove the burners and clean the area under the elements. New cooktops have glass tops. Use only the recommended cleaners for glass top stovetops to avoid scratching the surface.
Tip 8 – your bathroom – clean or replace the bathroom fan. The same applies to the shower curtain. Clean glass-enclosed shower walls and tiled walls. Check that the grout between the tiles is still in place. Moisture can seep behind the tiles causing significant problems otherwise. Make repairs to the grout as needed.
Tip 9 – replace air filters – this includes filters on your furnace, your AC if they are separate, and heat exchangers. Use a highly rated filter to capture smaller particles. If your furnace is dirty and your air filter is dirty, the chances are that your ducts are as well. Consider arranging for a duct cleaning company to clean all of your ducts.
Tip 10 – for allergy sufferers – spring cleaning can dislodge a great deal of dust. Wear a mask if you are allergic to dust, pollen, mold, or the chemicals you use during cleaning. Check the labels of your cleaning products for potential allergic reactions. Vent your vacuum outside or use heap filters and use a high-rated filter on your furnace and AC unit.
Common Spring Cleaning Mistakes
Spring has arrived, and everyone wants to open the windows and air out the house after being closed up over the winter months. For folks suffering from allergies, this step may make matters worse for them. Open windows allow dust, pollen, and mold to enter their homes, creating negative conditions for allergy sufferers. Keep the windows closed during windy conditions and at night when mold conditions are prevalent.
Other common mistakes many people make include:
Not starting from the top – dust collects on ceiling fans, and there are cobwebs in the corners of the ceiling. Clean these first, which will dislodge some dust that falls to the floor. Work your way down and then vacuum the floor and fabrics on the furniture
Cleaning without a plan – while you are gung ho today, after a few days, you may become overwhelmed and give up. Always have a plan that is organized and focused on the priorities you need to clean your house. You can track your progress accordingly and feel good about what you have accomplished.
Don’t forget to use all of the vacuum tools – the crevice tool is an excellent tool to get into tight spaces, and the small brush tool is great for baseboards and fabrics. Use the right tools for the right job to make you more efficient and get the job done.
Don’t skip the mattress – use an allergen mattress protector and wash the protector to remove all of the millions of skin cells and dust mites that reside in your mattress.
Be careful of cleaners, especially the harsh ones – they can damage your skin and your fabrics. Read the labels and only use as directed while taking the proper precautions to protect yourself and hour home.
Avoid using chemical-based air fresheners – they can cause allergic reactions in some people and are considered toxic pollutants.
Not decluttering first – it is much more difficult to clean when there is lots of clutter. Declutter first and then clean. You will be able to clean out dust that is hidden by all of the clutter.
Treating spring cleaning as a chore – can be demotivating. Set yourself up for success. Create a plan that you can measure your progress and your success. Your home will be clean, you will get some exercise during the process, and those with allergies will appreciate your clean smelling home.
Final Thoughts
For many people embarking on a spring cleaning can be an intimidating and overwhelming challenge, especially if you have avoided cleaning in the past. However, while it is a large job, breaking the job down into many tasks spread over several weeks makes it more manageable, allowing each person to measure their progress.
Develop a schedule and prioritize your tasks each day based on the more serious areas needing cleaning. Always clean from top to bottom. Decluttering should be one of the initial tasks since it is much easier to clean with all of the clutter removed. Donate, sell or dispose of the clutter. Remove any items you have not used in more than a year. This applies to clothes, books, magazines, and even toys for children and adults. They just take up room and collect dust.
Spring cleaning can improve your quality of life as well. Living in a dusty environment with clutter can contribute to allergies and malaise. Everyone feels better living in a clean house. Start cleaning today after you have completed an inventory and set up your schedule.