Whether you are cleaning your home as part of a move or doing a professional spring cleaning, making sure that tasks are clear and well organized is an important step. This is especially important if you offer a house cleaning service, which needs consistency and efficiency. One of the best ways to ensure that you aren’t missing details, big and small, is to use a house cleaning checklist.
What Is a House Cleaning Checklist?
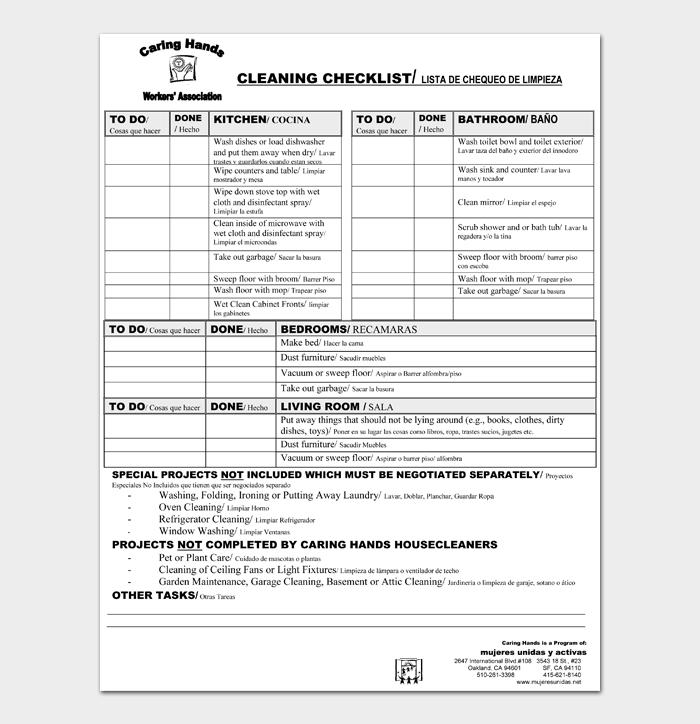
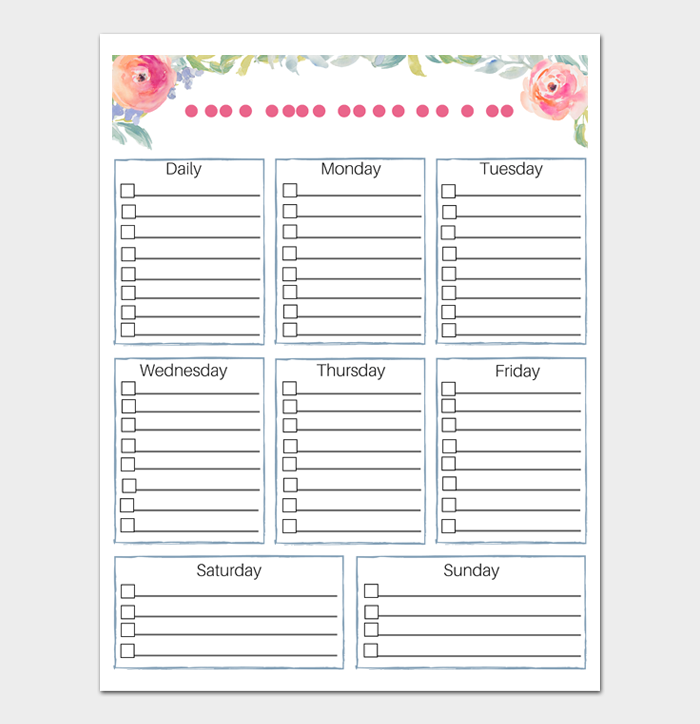
A house cleaning checklist is a detailed list that takes you through each area of a home and gives details regarding what needs to be cleaned. Think of it as a kind of To-Do list. Professional cleaning teams will use a house cleaning checklist to keep a cleaning team on track and to make sure each member knows who is taking care of which area of a home. It shows the progress as it is made, with each member checking off the tasks they have completed.
House cleaning checklists aren’t just helpful for professional cleaners! You can create one for your family to use when everyone needs to pitch in and get the job done. You can also create a house cleaning checklist to give specific tasks to a cleaning service that is coming to clean your home.
What is a House Cleaning Checklist Template?
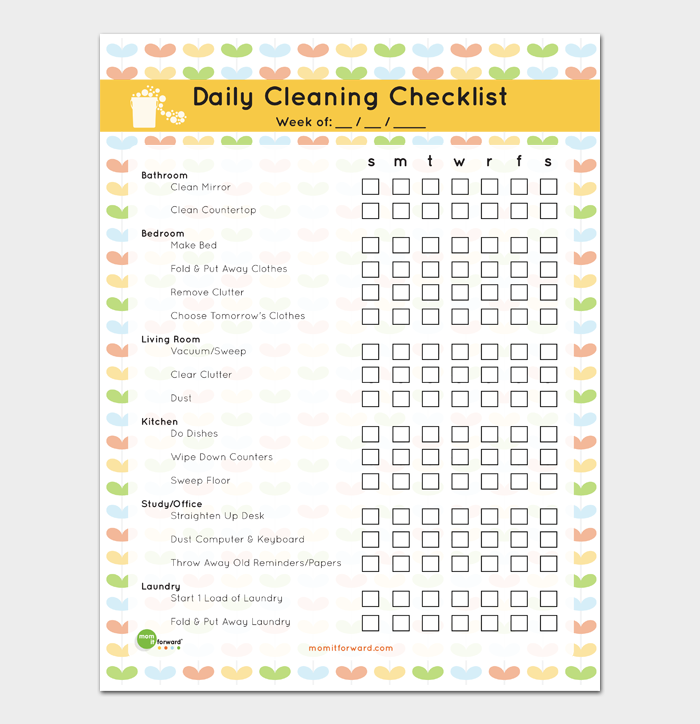
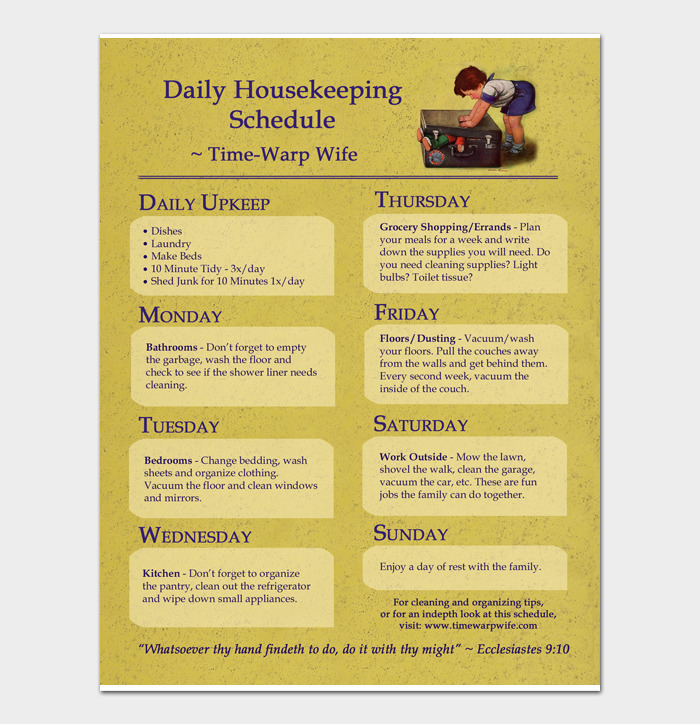
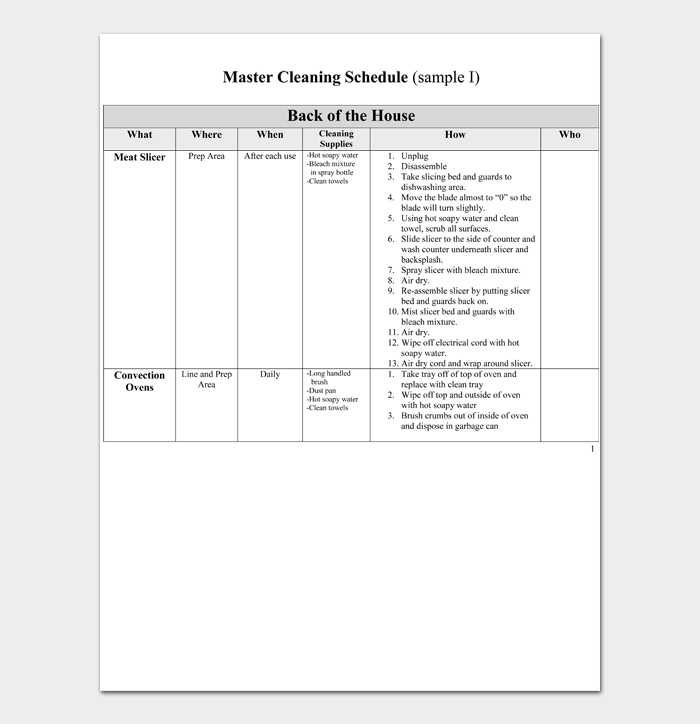
A housecleaning template is a pre-made document that can be used over and over for each cleaning job that you take on. The template will be broken down into specific rooms of the home and list what tasks need to be done. With a template, you can adjust the document and add extra items that a customer requests to be cleaned. For example, if the customer has a sunroom or garden shed that needs to be cleaned, you can add those items to your already created template. A template saves you from having to recreate a document over and over and allows for consistency.
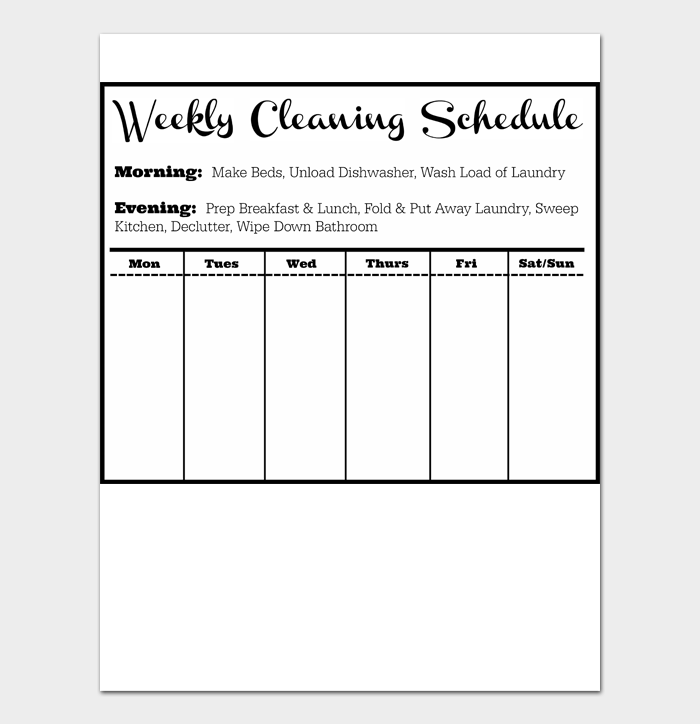
House Cleaning Checklist Templates & Examples
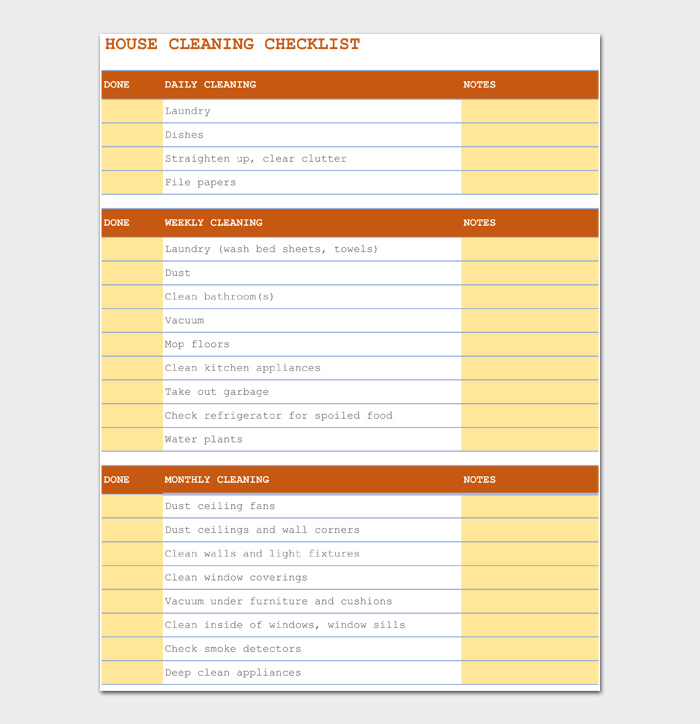


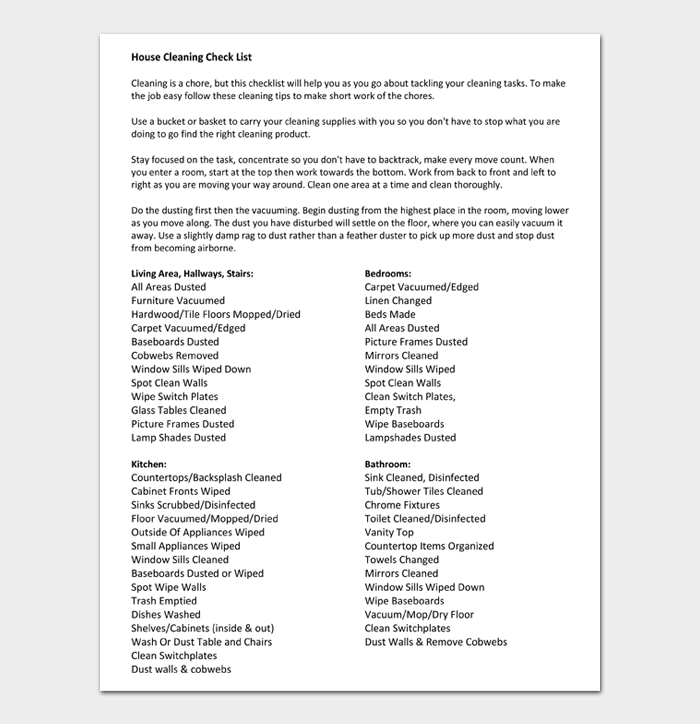
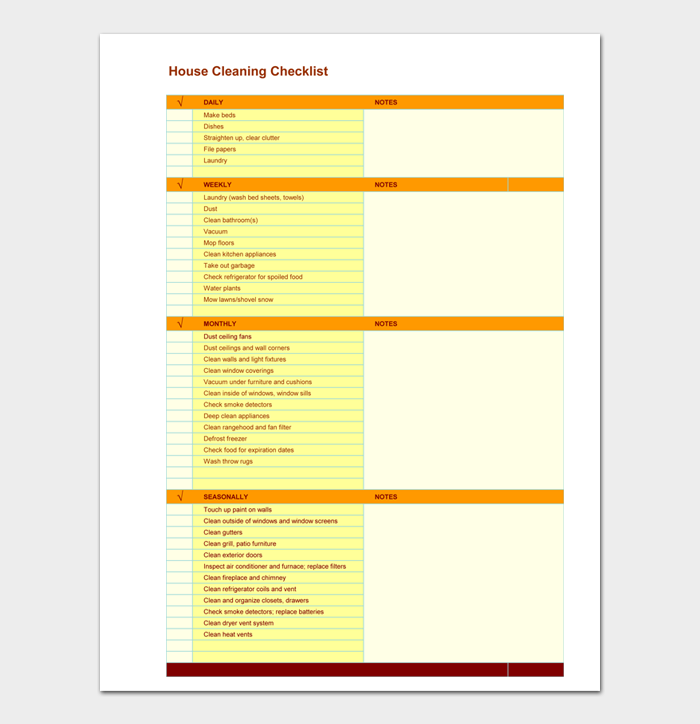
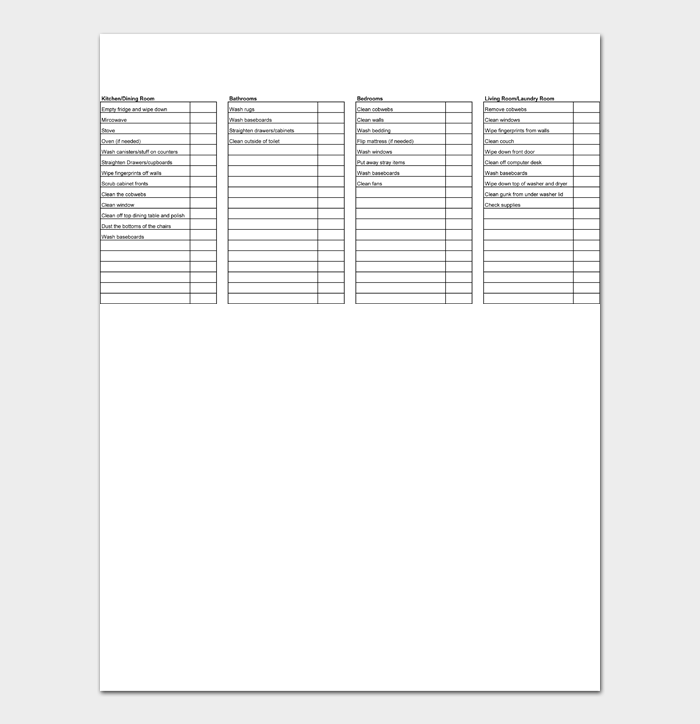
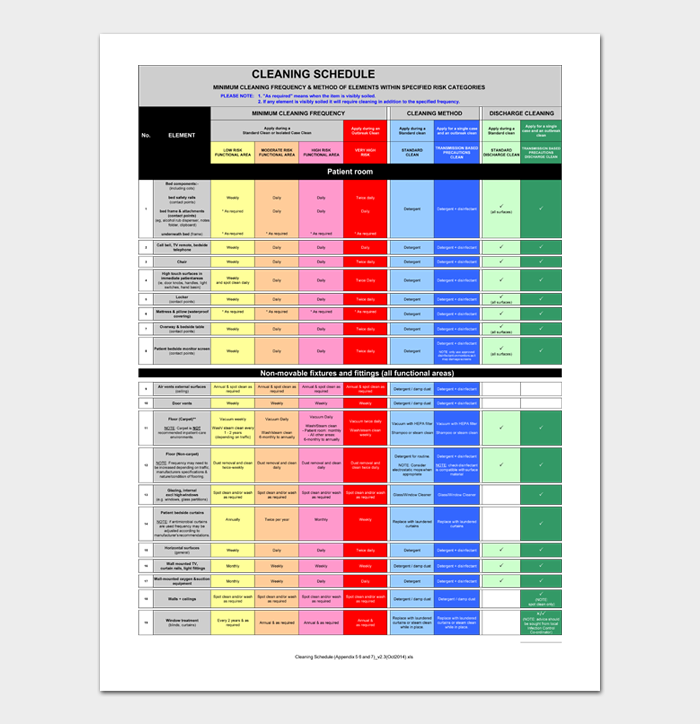
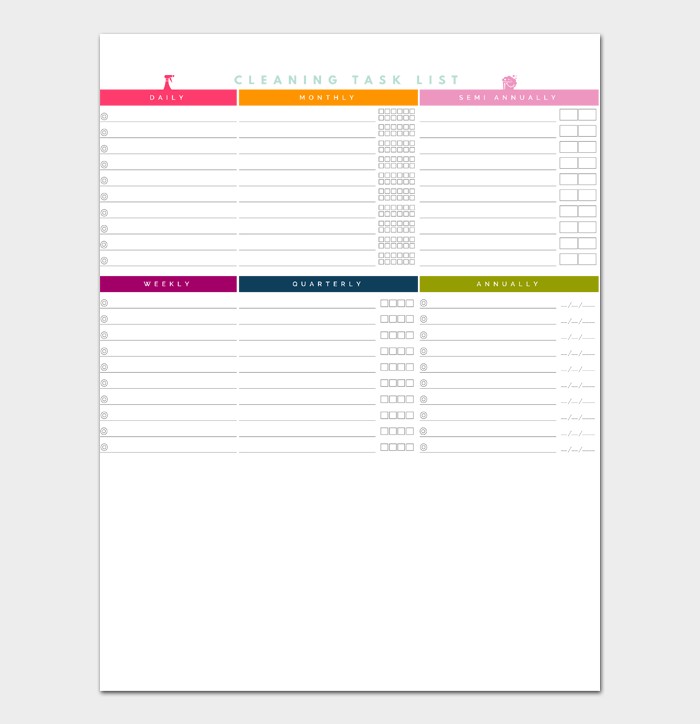
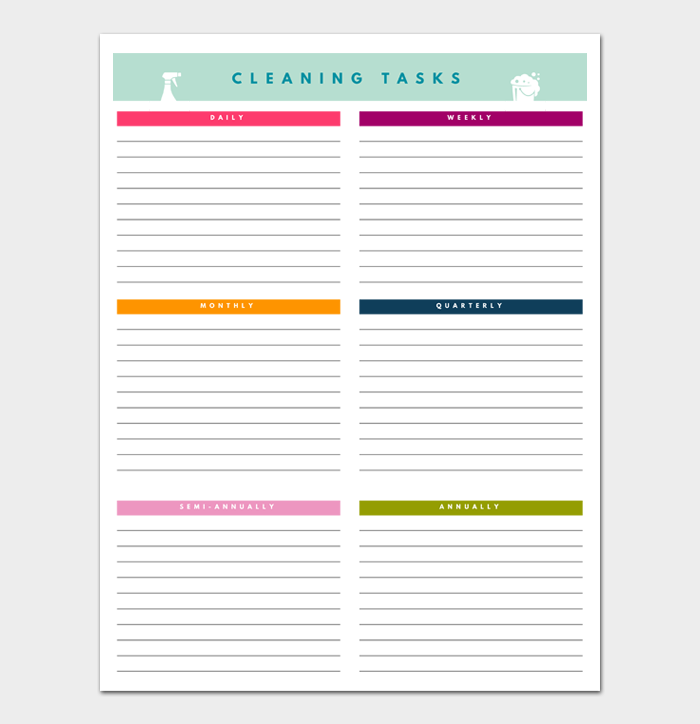
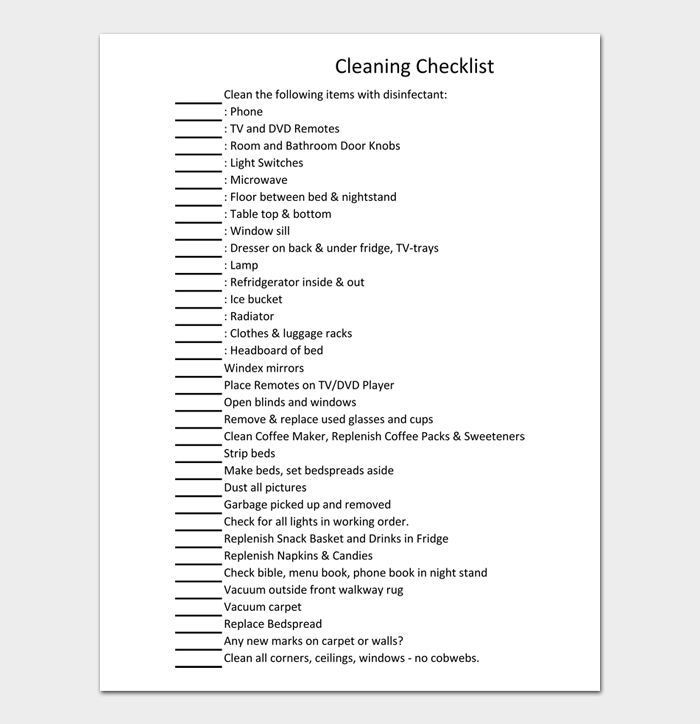


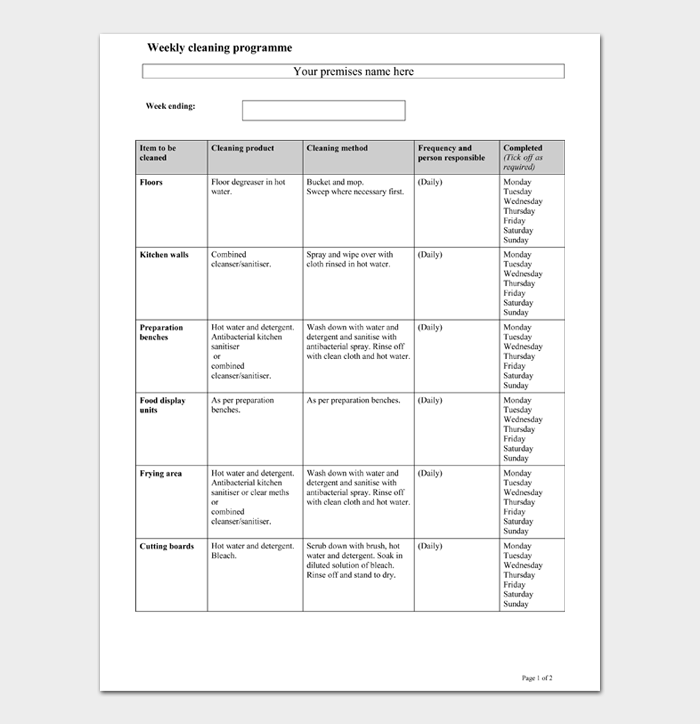
The House Cleaning Checklist
When creating your house cleaning checklist helps to get organized first. Have a walk through the home, room to room, and jot down the things that you would like to sort out. De-cluttering is the first thing to tackle. You can do this room by room, having a box or bag to put items in that don’t have a “home,” or you aren’t sure about keeping. Decluttering also makes it easier for yourself or the professional cleaners to have easy access to all areas of the rooms in your home, such as floors and surfaces.
Anything that you don’t need can either go in the trash or be put aside for charity. Also, don’t forget your closet spaces! There are some things to do before you begin that deep cleaning:
- Dusting – the most efficient way to dust the home is by starting at the top and working your way down. Dust left to right using a microfiber cloth. You can do this with windows opened to reduce the allergens and dust in the home, improving the air quality. DO you have cobwebs? Take a damp cloth and attach it to the end of a long stick to clear them. When dusting blinds, turn them one way, dust, then turn them in the opposite direction and dust again. Don’t forget to dust your light fixtures, door jambs, tops of doors and windows, knick-knacks, and fans. The reason for dusting before cleaning is that you will dislodge dirt, which will then be wiped up during the deep cleaning.
- Vacuum – all of that dust that you dislodged will settle on the floor, so you will need to vacuum before you mop. You can also vacuum soft furnishings
Now on to the house cleaning checklist itself. We’ll go room by room and list the most important areas to clean, some of which tend to get missed.
Checklist for the Kitchen
- Give your stovetop a good wipe down
- Make sure your surfaces are clear, and then give cabinets and countertops a thorough wipe-down
- Wipe down the exterior of all of your appliances, such as your dishwasher, refrigerator, and microwave
- Thoroughly clean the inside of your microwave, including the removable plate
- Clean around the sink and in the sink
- if your stove knobs and drip tray need cleaning, soak these first to break up grease
- Sweep the floor of debris and then mop. Make sure you don’t overdo it with cleaning products, though, because this can give the floor a tacky feeling
Checklist for the Bathroom
- Before you start cleaning, remove any garbage bins, rugs, and toiletries from the tub/shower and sink areas
- If you have a bath mat, remove it in order to clean under it. Quite often, debris and mold can form if bath mats aren’t regularly cleaned. You will need to give it a good scrub
- Using warm water, wet down the walls in your shower and/or wet down the tub
- Clean tiles and grout using a tile and grout cleaner. Once applied, allow it to sit for about an hour
- Using an all-purpose bathroom cleaner, clean everything in the bathroom, except for the tub, shower, toilet, vanity/countertops, and mirror
- Spray a toilet cleaner or bleach under the rim of the toilet and let it sit
- In a bucket, dilute ¼ cup of cleaner with water for cleaning the floor
- Once you have cleaned the bath mat, place it back in the tub/shower and use it to stand on while you scrub your shower door, walls, and tub
- Clean the shower/tub floor with some grout cleaner and a scrub brush
- Using a brush, clean the tracks of the shower
- Thoroughly wash out soap dishes and clean shower racks
- Give the walls of the shower/tub a good rinse and then dry using a microfiber cloth
- Now you can move on to the sink/vanity area. Using grout and tile cleaner, spray down the soap dish and sink
- While allowing the grout cleaner to sit for a few minutes, clean your countertops with an all-purpose cleaner
- Now you can give the sink a good scrub. Using a grout brush, make sure that you scrub around the sink drain and faucets. Give the faucets a shine by buffing them with a soft cloth
- Give the sink a good rinse, and then wipe the countertops down, as well as the front of the cabinets
- Using a glass cleaner and a soft cloth, clean the bathroom mirror
- Wipe down the outside of the toilet, base, and tank using an all-purpose cleaner. Using an anti-bacterial bathroom cleaner, wipe down the lid, seat, and rim of the toilet (make sure to wear gloves). Using a toilet brush, scrub under the toilet rim and in the bowl, then flush
- Remember that bucket that you set aside for floor washing? Now is the time to use it. Wash the floor and allow it to thoroughly dry
- Replace garbage bins, rugs, and bath mat
Checklist for the Bedroom
Most of the bedroom cleaning will have been done while you were dusting and vacuuming. Finish the cleaning by:
- Making the bed with fresh sheets
- Putting back any furniture that was moved when vacuuming
- Straighten up anything else that is out of place, such as knick-knacks and photos
Checklist for the Living Room
Like the bedroom, most of the cleaning will have been done while you dusted, de-cluttered, and vacuumed. Finish up by:
- Replacing any couch cushions, pillows, or throws
- Make sure that any moved items of furniture are put back in place
Checklist for Cleaning Windows
- Be sure to use a glass cleaner that is streak-free on windows and glass surfaces. Wipe them down using a newspaper
- For those hard-to-reach and larger windows, use a good quality squeegee
- Window screens should be removed from their frames and then scrubbed using a solution of warm water and an all-purpose cleaner. This should be done outside: using a bristle brush, scrub the screen down and then rinse it well using a garden hose. You can then insert the screen back into its window and allow it to air dry.
How to Clean Your House: 11 Efficient Tips
If you are taking on the job of cleaning your entire home, here are some great tips to get the job done efficiently:
- Don’t do one room at a time – you are probably thinking, “you said to tackle each room separately!” What we mean is to do the same task throughout the house. For example, dust the entire first, then vacuum, then mop. If you dust, vacuum, and mop one room and then start dusting in the next room, that dust will travel to your already cleaned room and resettle. It’s best to take one cleaning task and do each room, then move on to the next cleaning task.
- Gather your cleaning supplies – whether you are using a box, bag, or caddy, gather everything that you will need so that you can take them through the house with you. It will save you time and energy spent trying to hunt down cleaning supplies if they are all in one spot.
- Decluttering – we touched on this earlier. Before you begin cleaning, you should always declutter. Things that have a place can be put away, and the things that you don’t need can be tossed.
- Dust first and then vacuum – you should start dusting from the top down, as in, tops of furniture, windows, doors, and the undersides of shelves. Dust will fall and collect on whatever is underneath it until it settles on the floor, where you can then vacuum it up.
- Disinfecting – you should always disinfect surfaces like countertops and hard surfaces. This means doorknobs, appliances, phones, remote controls, and light switches. These are the areas where germs settle and can be spread. A good solution to use is ¼ apple cider or white vinegar and 1 cup of water.
- Wiping down the glass and reflective surfaces – the best way to do this is by using a damp microfiber cloth first and then a dry one to wipe it down.
- Toilets, tubs, and sinks – when cleaning these areas, spray cleaner on them and allow them to sit for a few minutes. It allows the cleaner to dissolve stains, grime, and dirt better. Clean counters first, and save toilets for last.
- Hard floors- when cleaning hard floors, be sure to sweep the area first and then mop. Mops should be rinsed after cleaning a 4×4 foot area. Also, start the furthest from the door and mop backward to avoid mopping yourself into a corner and having to step on that freshly cleaned floor.
- Vacuuming faster – if you tend to vacuum several times a week, you don’t have to worry about getting into every corner. One pass through each room of the house will suffice. Also, some cleaning tasks won’t need to be tackled every week, such as window cleaning, furniture polishing, and rug cleaning.
- Don’t go it alone – the best way to clean your home from top to bottom is to do it as a group. The more people that there are to tackle the job, the quicker it will get done.
Cleaning tools need cleaning, too – this is something that many people will overlook. Dust and cleaning rags need to be washed regularly, mops need a good cleaning, and vacuums need to be emptied regularly. You don’t want to mop a floor with a dirty mop. It just defeats the purpose of cleaning. A vacuum that hasn’t been emptied won’t work efficiently either.
FAQs
Start at the top of the house and work your way down. Dust and dirt that get kicked up in the air will eventually settle on lower levels.
Always vacuum or sweep a floor first. You want to remove dirt and debris before you mop.
Most likely, it is because your mop itself needs cleaning or the mop is old and needs replacing. Also, make sure that you are continually rinsing the mop after going over a 4×4 foot area, and replace the water and cleaning solution if you are cleaning a large area.
Generally, two hours is enough time for a cleaner to:
· Give your kitchen floor a quick mop and wipe down the counters
· Wash a small load of dishes
· Vacuum the main areas of the home
· Wipe down the sinks and faucets in the home
· Clean the toilet
Of course, it also depends on how dirty the home is.
Yes, it is possible to give your home a quick clean in an hour; this includes dusting, making the beds, vacuuming, and clearing up clutter.
House cleaners are professional cleaners. They have a routine and know-how to get a job done well and efficiently. For example, they will spray down counters in the kitchen and bathrooms and allow them to sit while they tackle the next job. When they come back to those counters, the dirt is much easier to wipe off.
Conclusion
House cleaning can be a pretty big task to take on, regardless of whether you are a professional cleaner or not. However, if planned well and done the right way, you can have a sparkling home in a matter of hours. Setting out a house cleaning checklist will help you keep on track and not miss those important little areas. This includes setting out a routine for how the home is cleaned, such as working from top to bottom and doing one task for the whole house at a time. This way, you won’t be stuck in a continuous cleaning loop.